KS0094 KEYESTUDIO CNC Kit V2.0: Difference between revisions
Keyestudio (talk | contribs) (Created blank page) |
Keyestudio (talk | contribs) No edit summary |
||
| Line 1: | Line 1: | ||
<br>[[File:0080=1.png|500px|frameless|thumb]]<br> | |||
Introduction | |||
Keyestudio CNC Shield V2.0 can be used as driver expansion board for engraving machines . It has in total 3 channel slots for A4988 stepper motor driver modules (not included) for driving 3 channel of stepper motors. Each channel of stepper motor only needs 2 IO ports, which means 6 IO ports is sufficient to manage 3 stepper motors. This shield can make quick work for managing stepper motors in your project. | |||
<br>[[File:0080=1.png|500px|frameless|thumb]]<br> | |||
== Specification == | |||
1. Keyestudio CNC Shield Version 2.0 | |||
2. GRBL 0.8c compatible. (Open source firmware that runs on an Arduino V4.0 board that turns G-code commands into stepper signals) | |||
3. 3-Axis support (X, Y, Z , ) | |||
4. 2 x End stops for each axis (6 in total) | |||
5. Spindle enable and direction | |||
6. Coolant enable | |||
7. Uses removable A4988 compatible stepper drivers. (A4988, DRV8825 and others) | |||
8. Jumpers to set the Micro-Stepping for the stepper drivers. (Some drivers like the DRV8825 can do up to 1/32 micro-stepping ) | |||
9. Compact design. | |||
10. Stepper Motors can be connected with 4 pin molex connectors or soldered in place. | |||
11. Runs on 12V DC. | |||
== Kit List == | |||
1x keyestudio CNC Shield V2.0 | |||
1x keyestudio V4.0 board | |||
3x A4988 Driver | |||
1x USB Cable | |||
== Connection Diagram == | |||
<br>[[File:0080=1.png|500px|frameless|thumb]]<br> | |||
== Install Arduino IDE and Driver == | |||
=== Download software === | |||
When we get control board, we need to download Arduino IDE and driver firstly. | |||
You could download Arduino IDE from the official website: | |||
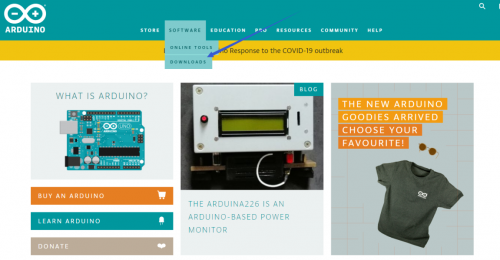
https://www.arduino.cc/, click the SOFTWARE on the browse bar, click “DOWNLOADS” to enter download page, as shown below: | |||
<br>[[File:0085=04.png|500px|frameless|thumb]]<br> | |||
There are various versions for Arduino, just download a suitable version for your system, we will take WINDOWS system as an example to show you how to download and install. | |||
<br>[[File:04862png.png|500px|frameless|thumb]]<br> | |||
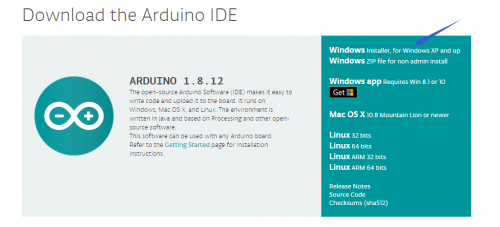
There are two versions for WINDOWS system, one is installed version, another one is download version, you just need to download file to computer directly and unzip it. These two versions can be used normally. Choose one and download on your computer. | |||
<br>[[File:04863png.png|500px|frameless|thumb]]<br> | |||
You just need to click JUST DOWNLOAD, then click the downloaded file to install it. And when the ZIP file is downloaded, you can directly unzip and start it. | |||
We need to know keyestudio V4.0 development board, as a core of this smart car. | |||
<br>[[File:0077-78--1.png|400px|frameless|thumb]]<br> | |||
(1)Keyestudio V4.0 Development Board | |||
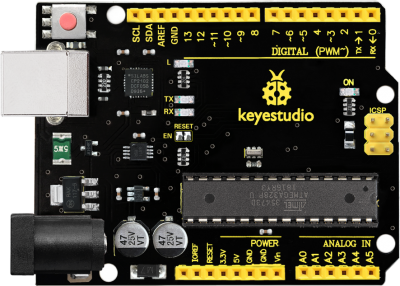
keyestudio V4.0 development board is an Arduino uno-compatible board, which is based on ATmega328P MCU, and with a cp2102 Chip as a UART-to-USB converter. | |||
<br>[[File:0470---42.png|500px|frameless|thumb]]<br> | |||
It has 14 digital input/output pins (of which 6 can be used as PWM outputs), 6 analog inputs, a 16 MHz quartz crystal, a USB connection, a power jack, 2 ICSP headers and a reset button. | |||
<br>[[File:0428---1000.png|500px|frameless|thumb]]<br> | |||
It contains everything needed to support the microcontroller; simply connect it to a computer with a USB cable or power it via an external DC power jack (DC 7-12V) or via female headers Vin/ GND(DC 7-12V) to get started. | |||
<br>[[File:0470---40.png|500px|frameless|thumb]]<br> | |||
=== Installing driver === | |||
Let’s install the driver of keyestudio PLUS control board. The USB-TTL chip on PLUS board adopts CP2102 serial chip. The driver program of this chip is included in Arduino 1.8 version and above, which is convenient. Plug on USB port of board, the computer can recognize the hardware and automatically install the driver of CP2102. | |||
If install unsuccessfully, or you intend to install manually, open the device manager of computer. Right click Computer----- Properties----- Device Manager. | |||
<br>[[File:0085=07.png|700px|frameless|thumb]]<br> | |||
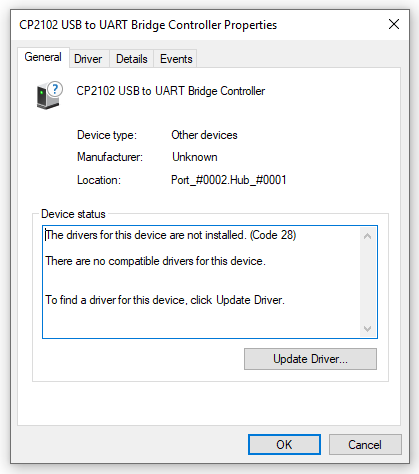
There is a yellow exclamation mark on the page, which implies installing the driver of CP2102 unsuccessfully. Then we double click the hardware and update the driver. | |||
<br>[[File:0085=08.png|500px|frameless|thumb]]<br> | |||
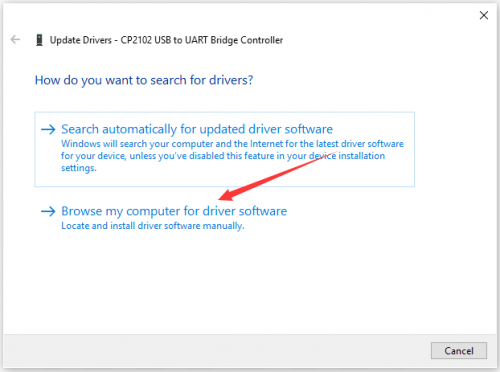
Click “OK” to enter the following page, click “browse my computer for updated driver software”, find out the installed or downloaded ARDUINO software. As shown below: | |||
<br>[[File:0085=09.png|500px|frameless|thumb]]<br> | |||
There is a DRIVERS folder in Arduino software installed package([[File:0085=10.png|500px|frameless|thumb]]), open driver folder and you can see the driver of CP210X series chips. | |||
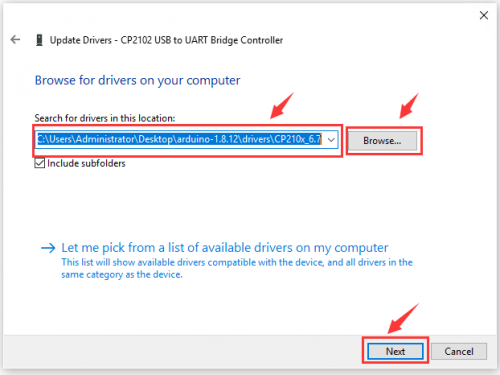
We click “Browse”, then find out the driver folder, or you could enter “driver” to search in rectangular box, then click “next”, the driver will be installed successfully. (I place Arduino software folder on the desktop, you could follow my way) | |||
<br>[[File:0085=11.png|500px|frameless|thumb]]<br> | |||
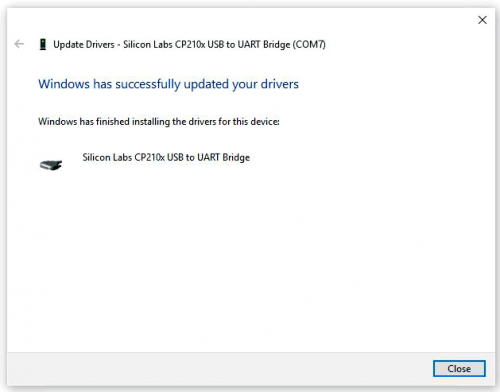
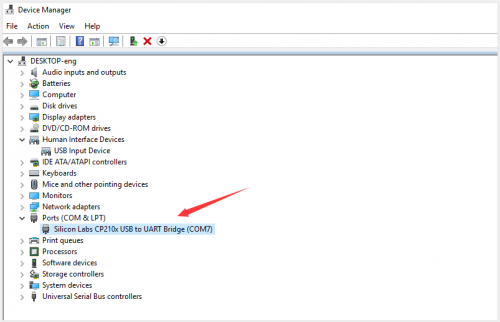
Open device manager, we will find the yellow exclamation mark disappear. The driver of CP2102 is installed successfully. | |||
<br>[[File:0085=12.png|500px|frameless|thumb]]<br> | |||
<br>[[File:0085=13.png|500px|frameless|thumb]]<br> | |||
=== '''Arduino IDE Setting''' === | |||
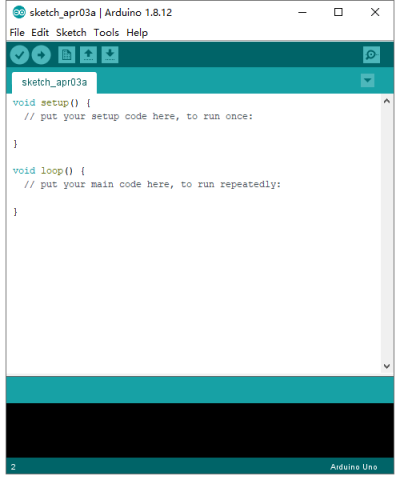
Click[[Image:0486-12.png|200px|frameless]] icon,open Arduino IDE. | |||
<br>[[Image:0085=14.png|400px|frameless]]<br> | |||
To avoid the errors when uploading the program to the board, you need to select the correct Arduino board that matches the board connected to your computer. | |||
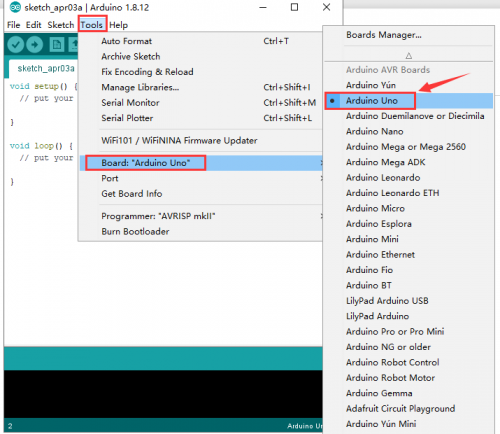
Then come back to the Arduino software, you should click Tools→Board, select the board. (as shown below) | |||
<br>[[Image:0085=15.png|500px|frameless]]<br> | |||
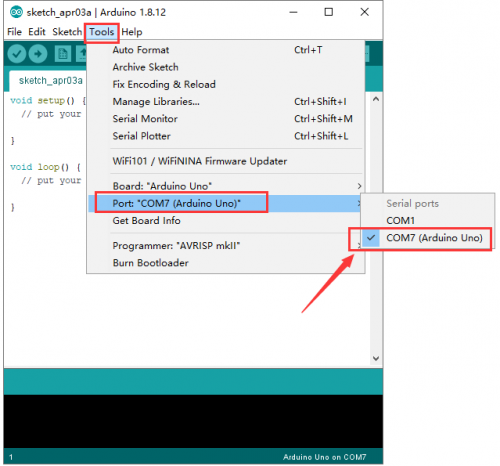
Then select the correct COM port (you can see the corresponding COM port after the driver is successfully installed) | |||
<br>[[Image:0085=16.png|500px|frameless]]<br> | |||
<br>[[Image:0085=17.png|500px|frameless]]<br> | |||
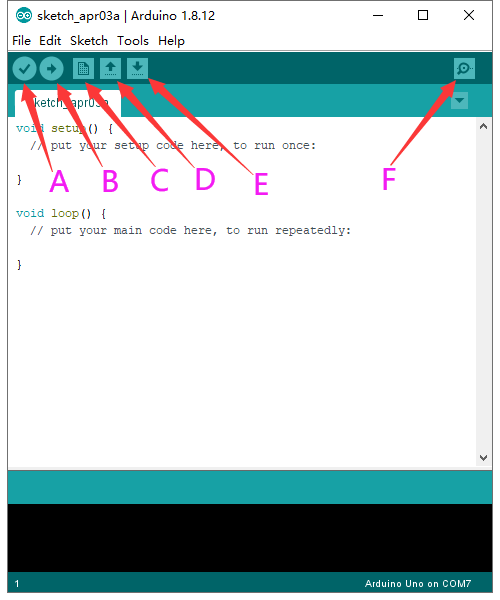
Before uploading the program to the board, let’s demonstrate the function of each symbol in the Arduino IDE toolbar.<br> | |||
A- Used to verify whether there is any compiling mistakes or not.<br> | |||
B- Used to upload the sketch to your Arduino board.<br> | |||
C- Used to create shortcut window of a new sketch.<br> | |||
D- Used to directly open an example sketch.<br> | |||
E- Used to save the sketch.<br> | |||
F- Used to send the serial data received from board to the serial monitor.<br> | |||
Revision as of 12:10, 18 November 2020
Introduction
Keyestudio CNC Shield V2.0 can be used as driver expansion board for engraving machines . It has in total 3 channel slots for A4988 stepper motor driver modules (not included) for driving 3 channel of stepper motors. Each channel of stepper motor only needs 2 IO ports, which means 6 IO ports is sufficient to manage 3 stepper motors. This shield can make quick work for managing stepper motors in your project.
Specification
1. Keyestudio CNC Shield Version 2.0 2. GRBL 0.8c compatible. (Open source firmware that runs on an Arduino V4.0 board that turns G-code commands into stepper signals) 3. 3-Axis support (X, Y, Z , ) 4. 2 x End stops for each axis (6 in total) 5. Spindle enable and direction 6. Coolant enable 7. Uses removable A4988 compatible stepper drivers. (A4988, DRV8825 and others) 8. Jumpers to set the Micro-Stepping for the stepper drivers. (Some drivers like the DRV8825 can do up to 1/32 micro-stepping ) 9. Compact design. 10. Stepper Motors can be connected with 4 pin molex connectors or soldered in place. 11. Runs on 12V DC.
Kit List
1x keyestudio CNC Shield V2.0 1x keyestudio V4.0 board 3x A4988 Driver 1x USB Cable
Connection Diagram
Install Arduino IDE and Driver
Download software
When we get control board, we need to download Arduino IDE and driver firstly. You could download Arduino IDE from the official website: https://www.arduino.cc/, click the SOFTWARE on the browse bar, click “DOWNLOADS” to enter download page, as shown below:
There are various versions for Arduino, just download a suitable version for your system, we will take WINDOWS system as an example to show you how to download and install.
There are two versions for WINDOWS system, one is installed version, another one is download version, you just need to download file to computer directly and unzip it. These two versions can be used normally. Choose one and download on your computer.
You just need to click JUST DOWNLOAD, then click the downloaded file to install it. And when the ZIP file is downloaded, you can directly unzip and start it.
We need to know keyestudio V4.0 development board, as a core of this smart car.
(1)Keyestudio V4.0 Development Board
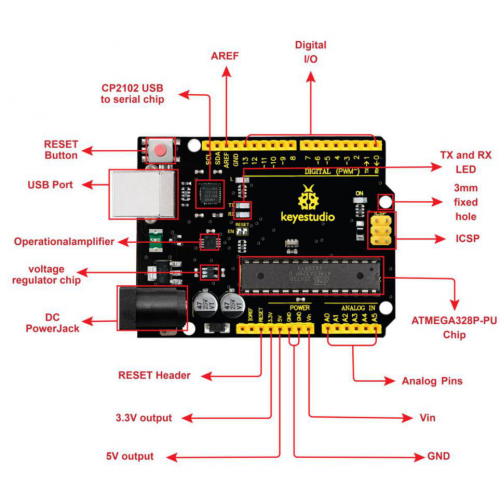
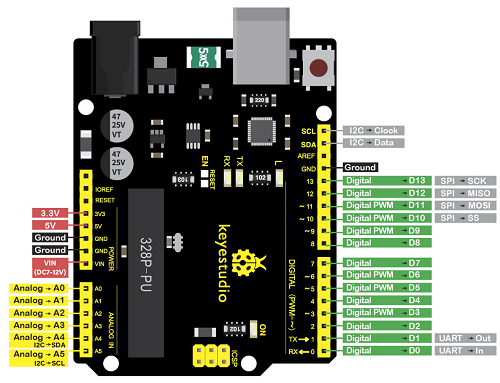
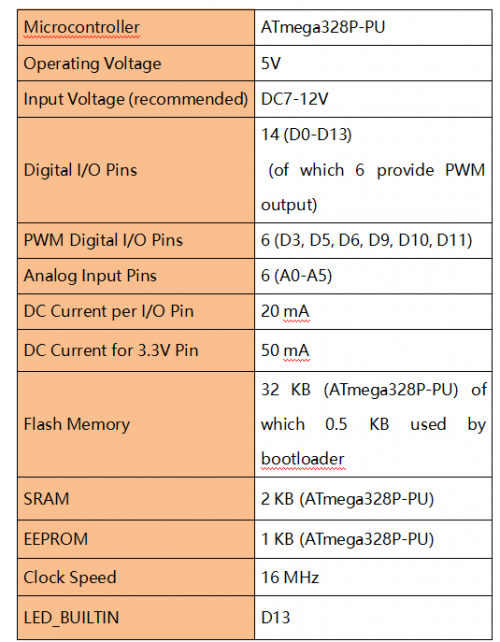
keyestudio V4.0 development board is an Arduino uno-compatible board, which is based on ATmega328P MCU, and with a cp2102 Chip as a UART-to-USB converter.
It has 14 digital input/output pins (of which 6 can be used as PWM outputs), 6 analog inputs, a 16 MHz quartz crystal, a USB connection, a power jack, 2 ICSP headers and a reset button.
It contains everything needed to support the microcontroller; simply connect it to a computer with a USB cable or power it via an external DC power jack (DC 7-12V) or via female headers Vin/ GND(DC 7-12V) to get started.
Installing driver
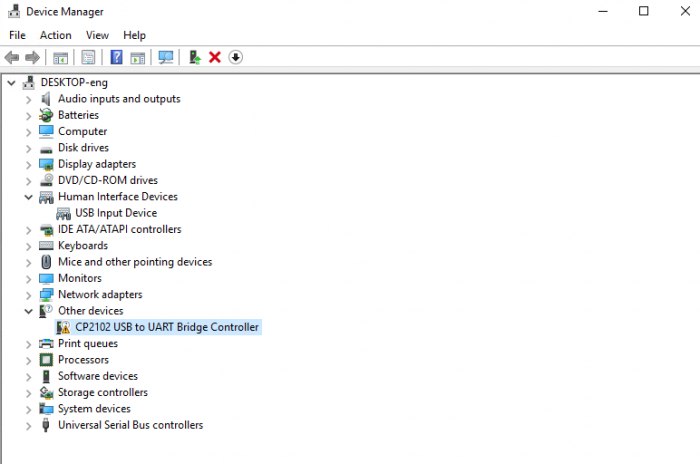
Let’s install the driver of keyestudio PLUS control board. The USB-TTL chip on PLUS board adopts CP2102 serial chip. The driver program of this chip is included in Arduino 1.8 version and above, which is convenient. Plug on USB port of board, the computer can recognize the hardware and automatically install the driver of CP2102.
If install unsuccessfully, or you intend to install manually, open the device manager of computer. Right click Computer----- Properties----- Device Manager.
There is a yellow exclamation mark on the page, which implies installing the driver of CP2102 unsuccessfully. Then we double click the hardware and update the driver.
Click “OK” to enter the following page, click “browse my computer for updated driver software”, find out the installed or downloaded ARDUINO software. As shown below:
There is a DRIVERS folder in Arduino software installed package(![]() ), open driver folder and you can see the driver of CP210X series chips.
), open driver folder and you can see the driver of CP210X series chips.
We click “Browse”, then find out the driver folder, or you could enter “driver” to search in rectangular box, then click “next”, the driver will be installed successfully. (I place Arduino software folder on the desktop, you could follow my way)
Open device manager, we will find the yellow exclamation mark disappear. The driver of CP2102 is installed successfully.
Arduino IDE Setting
To avoid the errors when uploading the program to the board, you need to select the correct Arduino board that matches the board connected to your computer.
Then come back to the Arduino software, you should click Tools→Board, select the board. (as shown below)
Then select the correct COM port (you can see the corresponding COM port after the driver is successfully installed)
Before uploading the program to the board, let’s demonstrate the function of each symbol in the Arduino IDE toolbar.
A- Used to verify whether there is any compiling mistakes or not.
B- Used to upload the sketch to your Arduino board.
C- Used to create shortcut window of a new sketch.
D- Used to directly open an example sketch.
E- Used to save the sketch.
F- Used to send the serial data received from board to the serial monitor.
