Ks0441 Keyestudio Desktop Mini Bluetooth Smart Car V3.0: Difference between revisions
Keyestudio (talk | contribs) |
Keyestudio (talk | contribs) |
||
| Line 36: | Line 36: | ||
<br>[[Image:441图4.png|500px|frameless]]<br> | <br>[[Image:441图4.png|500px|frameless]]<br> | ||
<br>[[Image:441图5.png|500px|frameless]]<br> | <br>[[Image:441图5.png|500px|frameless]]<br> | ||
<br> | |||
== Get Started with Mixly and ARDUINO == | |||
===<span style="color:blue"> 1)Installing Arduino IDE </span>=== | |||
When program the UNO development board, you can download the Arduino integrated development environment from the link: <br> | |||
* https://www.arduino.cc/en/Main/OldSoftwareReleases#1.5.x | |||
<br> | |||
See more contents at: <br> | |||
* https://wiki.keyestudio.com/Getting_Started_with_Arduino | |||
* https://wiki.keyestudio.com/How_to_Download_Arduino_IDE | |||
* https://wiki.keyestudio.com/How_to_Install_Arduino_Driver | |||
* https://wiki.keyestudio.com/How_to_Install_Arduino_Library | |||
<br>[[Image:Ks0436-9.png|550px|frameless]]<br> | |||
The functions of each button on the Toolbar are listed below: | |||
<br>[[Image:IDE.png|600px|frameless]]<br> | |||
{| class="wikitable" cellpadding="1" cellspacing="1" | |||
|- | |||
!scope="row" |[[Image:IDE 1.png|600px|frameless]] Verify/Compile | |||
| Check the code for errors | |||
|- | |||
!scope="row" |[[Image:IDE 2.png|600px|frameless]] Upload | |||
| Upload the current Sketch to the Arduino | |||
|- | |||
!scope="row" |[[Image:IDE 3.png|600px|frameless]] New | |||
| Create a new blank Sketch | |||
|- | |||
! scope="row" |[[Image:IDE 4.png|600px|frameless]] Open | |||
| Show a list of Sketches | |||
|- | |||
! scope="row" |[[Image:IDE 5.png|600px|frameless]] Save | |||
| Save the current Sketch | |||
|- | |||
! scope="row" |[[Image:IDE 6.png|600px|frameless]] Serial Monitor | |||
| Display the serial data being sent from the Arduino | |||
|- | |||
|} | |||
<br> | |||
Or you can browse the KEYESTUDIO website at this link, https://www.keyestudio.com/ and then click on the WIKI Tutorial. | |||
<br>[[Image:Ks0446图片6.png|650px|frameless]]<br> | |||
<br> | |||
===<span style="color:blue"> 2)Introduction for Mixly Blocks </span>=== | |||
Mixly is a free open-source graphical Arduino programming software, based on Google’s Blockly graphical programming framework, and developed by Mixly Team@ BNU.<br> | |||
It is a free open-source graphical programming tool for creative electronic development; a complete support ecosystem for creative e-education; a stage for maker educators to realize their dreams.<br> | |||
More info please check the link to download the Mixly blocks software. | |||
<br> | |||
* https://wiki.keyestudio.com/Getting_Started_with_Mixly | |||
* https://wiki.keyestudio.com/Download_Mixly_Software | |||
* https://wiki.keyestudio.com/How_to_Import_Mixly_Library | |||
Before starting the robot projects, please click the link to get the basic understanding of Mixly software. | |||
<br>[[Image:Ks0446图片8.png|700px|frameless]]<br> | |||
<br> | |||
===<span style="color:blue"> 3)Import Robot Library </span>=== | |||
<span style="color:red"> For the robot kit, we have developed keyestudio robot car library. <br> | |||
Don’t forget to import the keyestudio desktop car library to Mixly software before coding the robot projects.<br> | |||
Must import the robot car library first, or else you CANN'T check all the test code. </span><br> | |||
<br>[[File:441图6.png|700px|frameless]]<br> | |||
Unzip the desktop_car library package, you can see the '''desktop_car XML.document'''. | |||
<br>[[File:441图7.png|700px|frameless]]<br> | |||
Then import this document into Mixly library. Import custom library successfully! | |||
<br>[[File:441图8.png|700px|frameless]]<br> | |||
<br> | |||
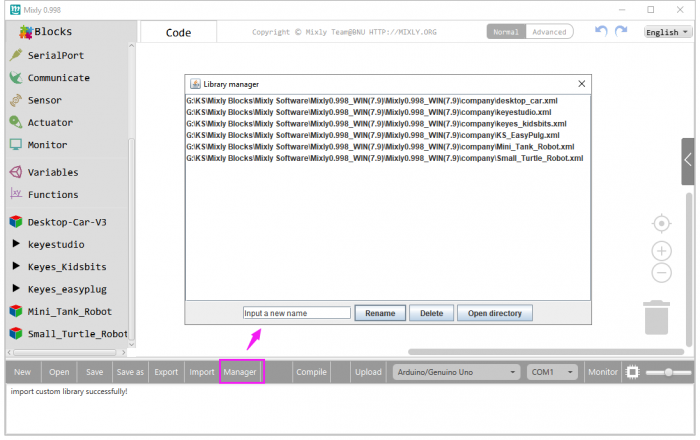
You are able to click “Manager” to manage all imported libraries. <br> | |||
<span style="color:red"> '''Note:''' sometimes it may exists a conflict between libraries, so should keep only correct car library when using and delete other library. </span><br> | |||
<br>[[File:441图9.png|700px|frameless]]<br> | |||
<br> | <br> | ||
Revision as of 14:23, 12 August 2019
Description
We can often see others on the internet making use of control boards and electrical components to build their own creative robots. Wanna DIY your own robot?
Here comes keyestudio desktop mini Bluetooth smart car V3.0, which is an upgraded version of keyestudio desktop mini Bluetooth smart car V2.0.
The smart car still keeps the functions like line tracking, obstacle avoidance, IR and Bluetooth control and more.
Furthermore, we make a great improvement for the smart car as follows:
- 1) The Acrylic plates are more bright and colorful;
- 2) Adding a microphone sound module to make a fantastic sound when driving the car run;
- 3) Using Bluetooth HM-10 module,which can support Bluetooth 4.0; supporting both Android and iOS system; also can actuate the smart car with our own designed Bluetooth APP.
- 4) Can freely choose the battery case 18650 or 4-cell AA battery case to supply power for the robot car. Note that batteries are Not Included. Users can freely choose two 18650 batteries or four AA batteries (1.5V) to supply power for the robot car.
- 5) Making improvements on the motor drive board; one is coming with a slide switch for controlling the power switch;the other is adding 8 jumper caps to control the DC motor direction,easy for code debugging.
- 6) Coding the robot car with Mixly blocks software, simple and ready to play.
From the basics up to complex projects, through this kit you can learn to control the robot car with Mixly blocks coding. Easy to code and learn coding and computational thinking.
If you are looking for inspiration, you can find a great variety of tutorials here. Take your brain on a fun and inspiring journey through the world of programming and electronics.
Parameters
- 1)Motor Voltage range: 1-6V; motor shaft length: 10mm; speed: 6.0V 100rpm/min.
- 2)Motor control is driven by L298P;
- 3)Three groups of line tracking modules, to detect black-white line with higher accuracy and can also be used for anti-fall control;
- 4)Two groups of obstacle detector modules, to detect whether there are obstacles on the left or right side of smart car; Ultrasonic module is used to detect the distance between ultrasonic and obstacles, forming the smart car’s obstacle avoidance system;
- 5)Bluetooth wireless module can be paired with Bluetooth device on mobile phone to remotely control smart car;
- 6)Infrared receiver module is matched with an infrared remote control to control the smart car;
- 7)Can access the external 7 ~ 12V voltage.
Component List
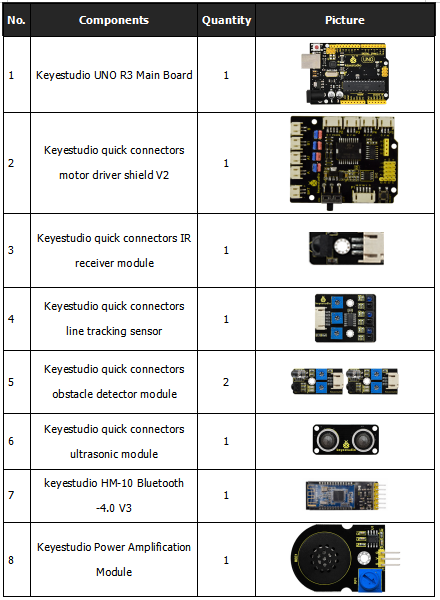
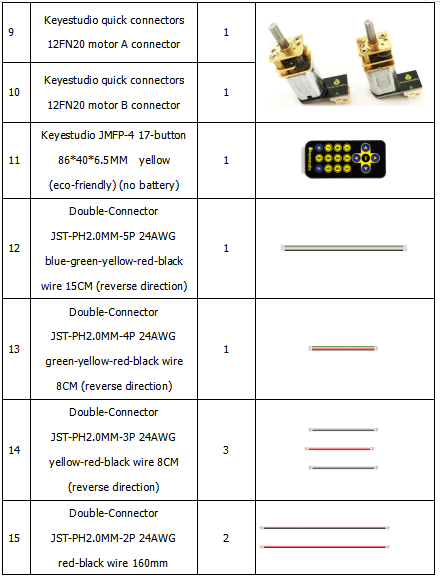
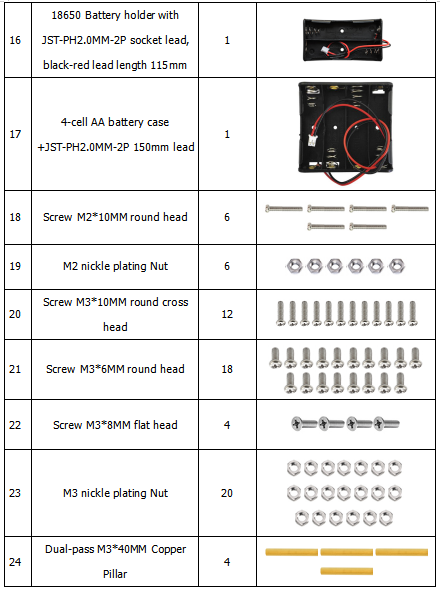
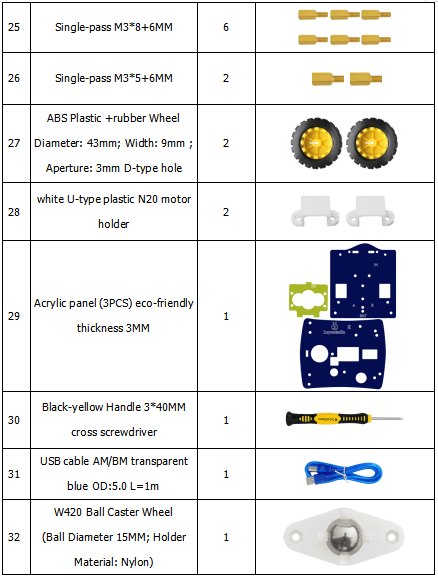
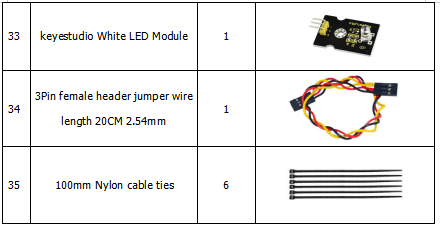
When get this smart car kit, at first glance, you will see the beautiful packaging box. And each component is safely packed inside the small bag in order. You will get such a bulk of components and screws to make your own smart car. So we have listed all the components as follows:
Get Started with Mixly and ARDUINO
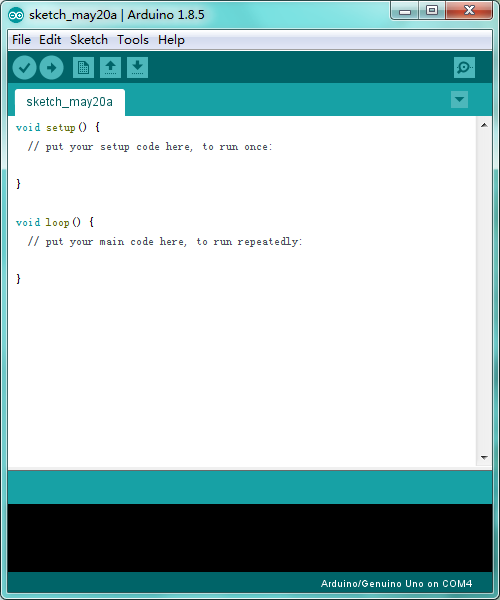
1)Installing Arduino IDE
When program the UNO development board, you can download the Arduino integrated development environment from the link:
See more contents at:
- https://wiki.keyestudio.com/Getting_Started_with_Arduino
- https://wiki.keyestudio.com/How_to_Download_Arduino_IDE
- https://wiki.keyestudio.com/How_to_Install_Arduino_Driver
- https://wiki.keyestudio.com/How_to_Install_Arduino_Library
The functions of each button on the Toolbar are listed below:
![]()
Or you can browse the KEYESTUDIO website at this link, https://www.keyestudio.com/ and then click on the WIKI Tutorial.

2)Introduction for Mixly Blocks
Mixly is a free open-source graphical Arduino programming software, based on Google’s Blockly graphical programming framework, and developed by Mixly Team@ BNU.
It is a free open-source graphical programming tool for creative electronic development; a complete support ecosystem for creative e-education; a stage for maker educators to realize their dreams.
More info please check the link to download the Mixly blocks software.
- https://wiki.keyestudio.com/Getting_Started_with_Mixly
- https://wiki.keyestudio.com/Download_Mixly_Software
- https://wiki.keyestudio.com/How_to_Import_Mixly_Library
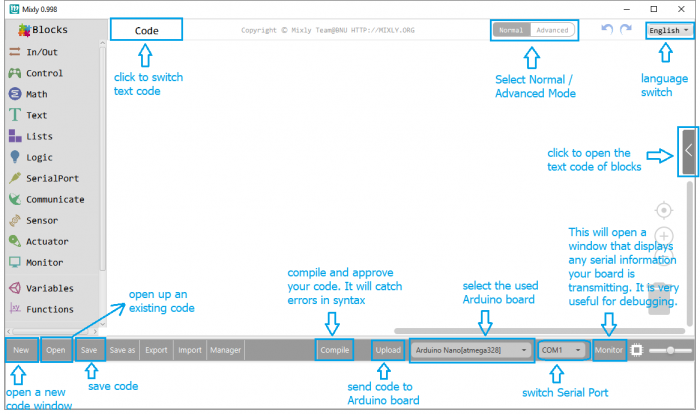
Before starting the robot projects, please click the link to get the basic understanding of Mixly software.
3)Import Robot Library
For the robot kit, we have developed keyestudio robot car library.
Don’t forget to import the keyestudio desktop car library to Mixly software before coding the robot projects.
Must import the robot car library first, or else you CANN'T check all the test code.
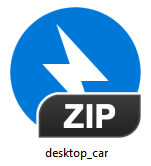
Unzip the desktop_car library package, you can see the desktop_car XML.document.

Then import this document into Mixly library. Import custom library successfully!
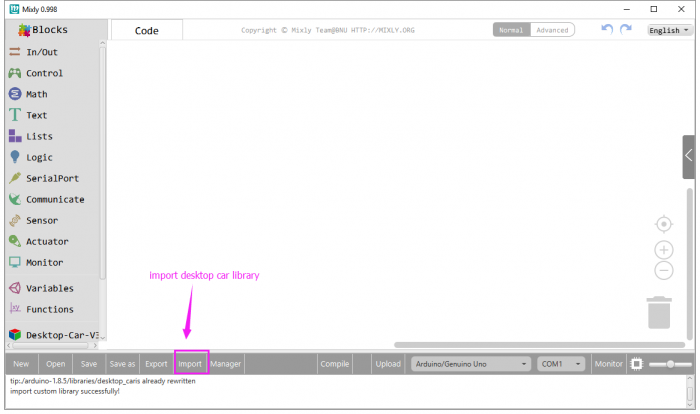
You are able to click “Manager” to manage all imported libraries.
Note: sometimes it may exists a conflict between libraries, so should keep only correct car library when using and delete other library.
