Ks0154 keyestudio Mega Pololu Shield (RAMPS 1.4 ): Difference between revisions
Keyestudio (talk | contribs) |
Keyestudio (talk | contribs) No edit summary |
||
| Line 1: | Line 1: | ||
[[image:ks0154.png.png|thumb|600px|right|Keyestudio UNO R3 Board]] | |||
==Introduction== | ==Introduction== | ||
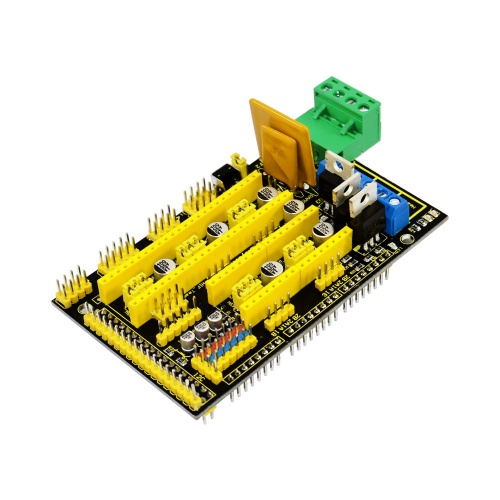
keyestudio RAMPS1.4A is used as driving shield for 3D printers, fully compatible with h[ttp://wiki.keyestudio.com/index.php/Ks0002_keyestudio_Mega_2560_R3_Development_Board MEGA2560 control board] and official RAMPS 1.4 .<br> | |||
<br>[[File:KS0154 (8).jpg|500px|frameless|thumb]]<br> | It has total 5 slots for stepper motor drive module to drive 5-channel stepper motors. The slots are compatible with all kinds of drive modules like [http://www.keyestudio.com/keyestudio-reprap-stepper-motor-driver.html A4988], [http://www.keyestudio.com/keyestudio-drv8825-stepper-motor-driver-for-3d-printer.html DEV8825]. | ||
There are 3 jumper caps under each slot, which can be used to control the working subdivision of drive modules. <br> | |||
For example, if connect the A4988 and plug three jumpers, the subdivision port MS1、MS2 and MS3 of A4988 module are at active HIGH, so the A4988 module is in 16-subdivision working mode.<br> | |||
But if unplug the three jumpers, MS1、MS2 and MS3 of A4988 module are at active LOW, so the A4988 module is in full-step working mode.<br> | |||
Furthermore, it is easy to stack it onto the MEGA 2560 control board, after burning the program, you can combine it with external devices to make your own 3D printer.<br> | |||
[[File:KS0154 (8).jpg|500px|frameless|thumb]]<br> | |||
<br> | |||
==Check out these awesome features== | |||
* MEGA 2560 control board compatible | |||
* Supports the software Repetier-Host | |||
* Can drive 5 stepper motors | |||
* Control the drive module via jumper cap. (Note: If connect the A4988, unplug three jumpers, in full-step mode; if plug the jumpers, in 16-subdivision working mode.) | |||
* Comes with 4pin headers of 2.54mm pitch for 42 step motor connection. | |||
* Supply the voltage DC 12V for 3D printer. | |||
* Onboard comes with 4 LEDs, separately are 2 Heat LEDs, a Heat Bed LED and a D13 LED. | |||
* Comes with 2 Heat interfaces (D10, D9 control) and a Heat Bed interface(D8 control) | |||
* Onboard comes with a reset button | |||
* Comes with other interfaces for 3D Printer, such as LCD connection pins ( need to connect the pinboard), limit switch pins, cooling fan interface. | |||
<br> | |||
==Technical Details== | |||
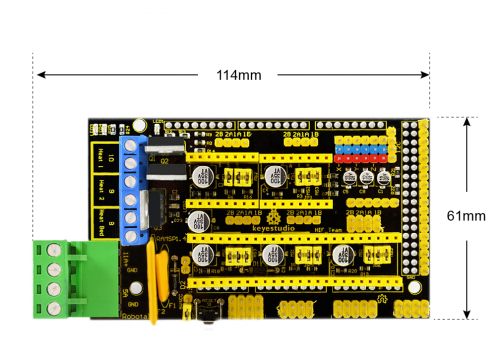
* Dimensions: 114mm x 61mm x 32mm | |||
* Weight: 67.5g | |||
<br>[[File:KS0154 Detail.png|500px|frameless|thumb]]<br> | |||
<br> | |||
==PINOUT Instruction== | |||
<br>[[File:KS0154 pinout.jpg|500px|frameless|thumb]]<br> | |||
<br> | |||
==Using Method== | |||
When using this shield, on the hardware, you need to use it with the control board ([http://wiki.keyestudio.com/index.php/Ks0002_keyestudio_Mega_2560_R3_Development_Board MEGA2560 board]), the drive board (such as [http://www.keyestudio.com/keyestudio-reprap-stepper-motor-driver.html A4988]), the motor (42 stepper motor) and others. And you need to burn the firmware to the control board. So need to use the software [http://wiki.keyestudio.com/index.php/How_to_Download_Arduino_IDE Arduino IDE], and the special upper computer software, such as Repetier-Host software.<br> | |||
For detailed use, refer to our [ http://wiki.keyestudio.com/index.php/Ks0091_keyestudio_3D_Printer_Kit_RAMPS_1.4_%2B_Mega_2560_%2B_5x_A4988_%2B_LCD_2004_Smart_Controller keyestudio 3D Printer Kit] on wiki website. | |||
==Resources == | ==Resources == | ||
Revision as of 15:48, 26 September 2018
Introduction
keyestudio RAMPS1.4A is used as driving shield for 3D printers, fully compatible with h[ttp://wiki.keyestudio.com/index.php/Ks0002_keyestudio_Mega_2560_R3_Development_Board MEGA2560 control board] and official RAMPS 1.4 .
It has total 5 slots for stepper motor drive module to drive 5-channel stepper motors. The slots are compatible with all kinds of drive modules like A4988, DEV8825.
There are 3 jumper caps under each slot, which can be used to control the working subdivision of drive modules.
For example, if connect the A4988 and plug three jumpers, the subdivision port MS1、MS2 and MS3 of A4988 module are at active HIGH, so the A4988 module is in 16-subdivision working mode.
But if unplug the three jumpers, MS1、MS2 and MS3 of A4988 module are at active LOW, so the A4988 module is in full-step working mode.
Furthermore, it is easy to stack it onto the MEGA 2560 control board, after burning the program, you can combine it with external devices to make your own 3D printer.

Check out these awesome features
- MEGA 2560 control board compatible
- Supports the software Repetier-Host
- Can drive 5 stepper motors
- Control the drive module via jumper cap. (Note: If connect the A4988, unplug three jumpers, in full-step mode; if plug the jumpers, in 16-subdivision working mode.)
- Comes with 4pin headers of 2.54mm pitch for 42 step motor connection.
- Supply the voltage DC 12V for 3D printer.
- Onboard comes with 4 LEDs, separately are 2 Heat LEDs, a Heat Bed LED and a D13 LED.
- Comes with 2 Heat interfaces (D10, D9 control) and a Heat Bed interface(D8 control)
- Onboard comes with a reset button
- Comes with other interfaces for 3D Printer, such as LCD connection pins ( need to connect the pinboard), limit switch pins, cooling fan interface.
Technical Details
- Dimensions: 114mm x 61mm x 32mm
- Weight: 67.5g
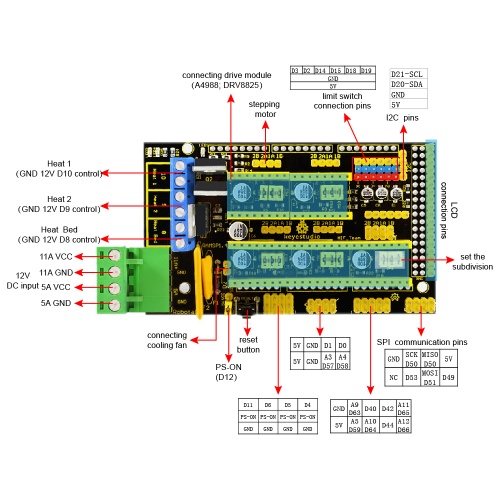
PINOUT Instruction
Using Method
When using this shield, on the hardware, you need to use it with the control board (MEGA2560 board), the drive board (such as A4988), the motor (42 stepper motor) and others. And you need to burn the firmware to the control board. So need to use the software Arduino IDE, and the special upper computer software, such as Repetier-Host software.
For detailed use, refer to our [ http://wiki.keyestudio.com/index.php/Ks0091_keyestudio_3D_Printer_Kit_RAMPS_1.4_%2B_Mega_2560_%2B_5x_A4988_%2B_LCD_2004_Smart_Controller keyestudio 3D Printer Kit] on wiki website.
Resources
https://drive.google.com/open?id=1OeTcU11iECNwm1wGgsU7fyuzPNtUZ-2r
Get One Now
Website
Amazon

