Ks0105 keyestudio EASY plug Analog Sound Sensor: Difference between revisions
Keyestudio (talk | contribs) |
Keyestudio (talk | contribs) |
||
| (8 intermediate revisions by the same user not shown) | |||
| Line 4: | Line 4: | ||
This sound sensor is typically used in detecting the loudness in ambient environment.You can use it to make interactive circuits such as a voice-operated switch.<br> | This sound sensor is typically used in detecting the loudness in ambient environment.You can use it to make interactive circuits such as a voice-operated switch.<br> | ||
The sound sensitivity can be adjusted by the potentiometer. The sensor comes with a fixed hole, easy for fixation on other devices. <br> | The sound sensitivity can be adjusted by the potentiometer. The sensor comes with a fixed hole, easy for fixation on other devices. <br> | ||
<span style= | This module should be used together with EASY plug control board.<br> | ||
<span style=color:red> '''Special Note:''' <br> | |||
The sensor/module is equipped with the RJ11 6P6C interface, compatible with our keyestudio EASY plug Control Board with RJ11 6P6C interface. <br> If you have the control board of other brands, it is also equipped with the RJ11 6P6C interface but has different internal line sequence, can’t be used compatibly with our sensor/module. </span><br> | |||
<br> | <br> | ||
| Line 26: | Line 29: | ||
==Upload the Code== | ==Upload the Code== | ||
Below is an example code. Open or drag below code to [https://wiki.keyestudio.com/Getting_Started_with_Mixly Mixly Blocks] and upload. <br> | |||
< | <br>[[File:ks0397 15.1.png|600px|frameless|thumb]]<br> | ||
< | |||
<br> | <br> | ||
<br> | |||
==What You Should See== | ==What You Should See== | ||
After uploading the code, open the serial monitor and set the baud rate to 9600, you should see the analog value showed on the monitor. | <br>[[File:ks0397 15-1.png|600px|frameless|thumb]]<br> | ||
<br>[[File: | |||
After uploading the code, open the serial monitor and set the baud rate to 9600, you should see the analog value is showed on the monitor. | |||
<br>[[File:ks0397 15-2.png|600px|frameless|thumb]]<br> | |||
<br> | |||
==Extension Experiment== | |||
<span style=color:brown><big>'''Adding LCD Display'''</big> </span><br> | |||
'''Connect It Up'''<br> | |||
Connect the EASY Plug sound sensor and LCD module to control board using RJ11 cables. | |||
<br>[[File:声音LCD.jpg|600px|frameless|thumb]]<br> | |||
<br> | |||
'''Upload the Code'''<br> | |||
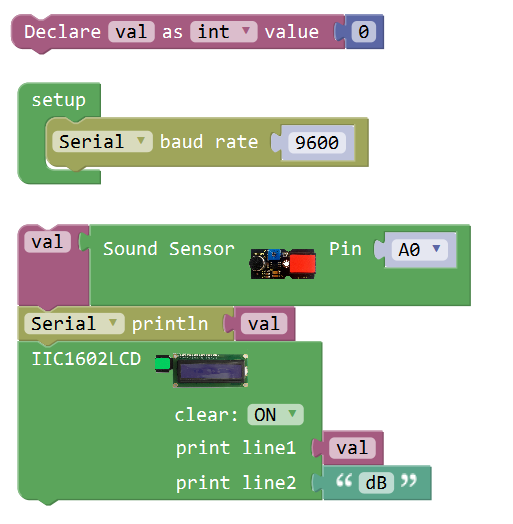
Below is an example code. | |||
<br>[[File:ks0397 15.2.png|600px|frameless|thumb]]<br> | |||
<br> | |||
'''What You Should See'''<br> | |||
<br>[[File:ks0397 15-3.png|600px|frameless|thumb]]<br> | |||
Upload the code successfully, when the sensor detects the outside sound, the LCD screen will show the sound volume, and its unit is decibel (dB). | |||
<br>[[File:ks0397 15-4.png|600px|frameless|thumb]]<br> | |||
<br> | |||
<span style="color: red">'''Little Knowledge:'''</span> <br> | |||
* Remember you can adjust the contrast by rotating a blue potentiometer on the LCD back if you can’t make out the words clearly. | |||
<br>[[File:ks0397 14-6.png|600px|frameless|thumb]]<br> | |||
<br> | |||
<br> | <br> | ||
==Resources == | ==Resources == | ||
https:// | https://fs.keyestudio.com/KS0105 | ||
<br> | <br> | ||
==Buy from == | ==Buy from == | ||
* | *[https://www.keyestudio.com/keyestudio-easy-plug-analog-sound-sensor-for-arduino-steam-p0079-p0079.html '''Official Website''' ] | ||
*[https://www.aliexpress.com/store/product/2016NEW-Keyestudio-EASY-plug-Analog-Sound-Sensor-for-Arduino/1452162_32637437102.html?spm=2114.12010612.8148356.1.51822d10dYg3Wa Shop on aliexpress ] | |||
[[category:EASY Plug]] | [[category:EASY Plug]] | ||
Latest revision as of 15:52, 7 January 2021
Introduction
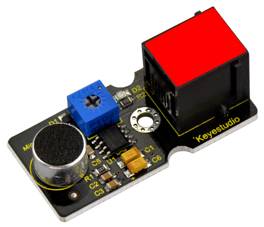
This sound sensor is typically used in detecting the loudness in ambient environment.You can use it to make interactive circuits such as a voice-operated switch.
The sound sensitivity can be adjusted by the potentiometer. The sensor comes with a fixed hole, easy for fixation on other devices.
This module should be used together with EASY plug control board.
Special Note:
The sensor/module is equipped with the RJ11 6P6C interface, compatible with our keyestudio EASY plug Control Board with RJ11 6P6C interface.
If you have the control board of other brands, it is also equipped with the RJ11 6P6C interface but has different internal line sequence, can’t be used compatibly with our sensor/module.
Specification
- Sensor type: Analog
- Supply Voltage: 3.3V to 5V
- Operating current:<10mA
- Output signal:analog signal
Technical Details
- Dimensions: 42mm*20mm*18mm
- Weight: 6.0g
Connect It Up
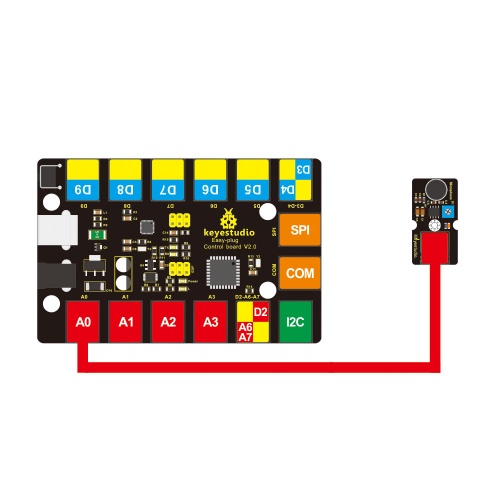
Connect the EASY Plug sound sensor to control board using an RJ11 cable. Then connect the control board to your PC with a USB cable.
Upload the Code
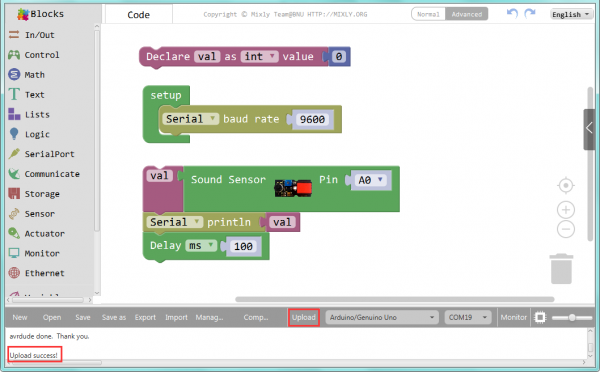
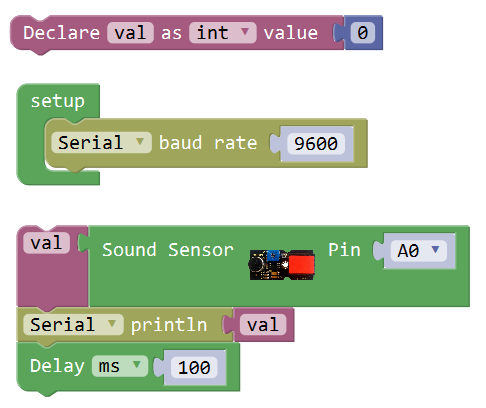
Below is an example code. Open or drag below code to Mixly Blocks and upload.
What You Should See
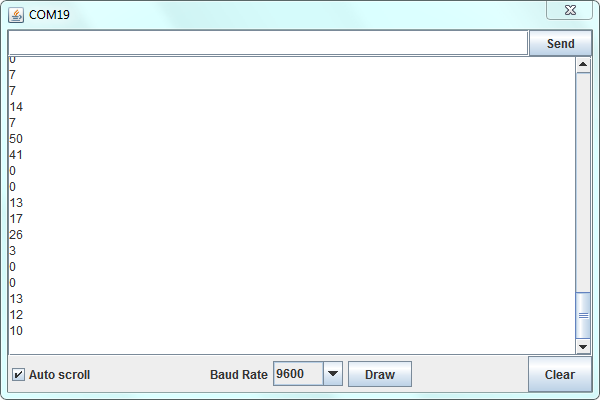
After uploading the code, open the serial monitor and set the baud rate to 9600, you should see the analog value is showed on the monitor.
Extension Experiment
Adding LCD Display
Connect It Up
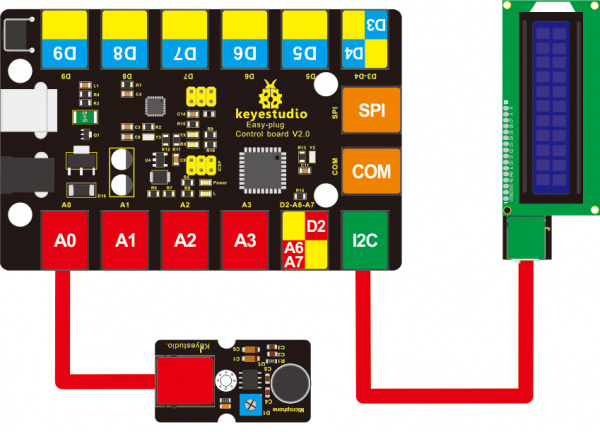
Connect the EASY Plug sound sensor and LCD module to control board using RJ11 cables.
Upload the Code
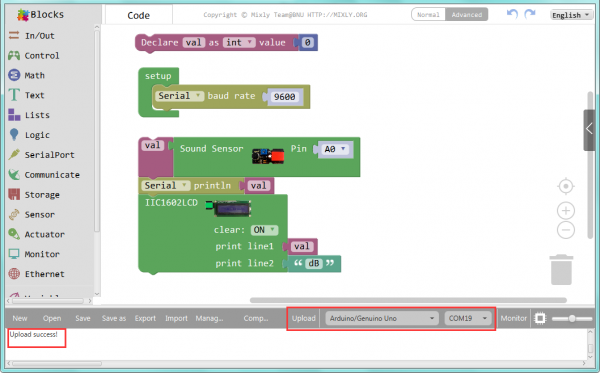
Below is an example code.
Upload the code successfully, when the sensor detects the outside sound, the LCD screen will show the sound volume, and its unit is decibel (dB).

Little Knowledge:
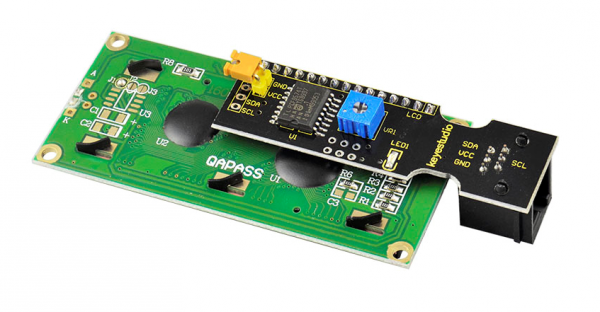
- Remember you can adjust the contrast by rotating a blue potentiometer on the LCD back if you can’t make out the words clearly.
Resources
https://fs.keyestudio.com/KS0105
